Sunday, January 29, 2012

Chili


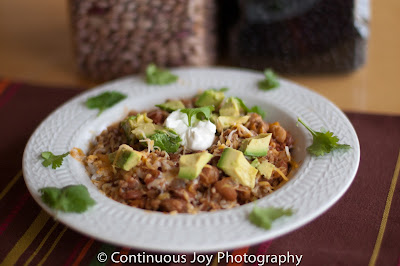
This is my basic Chili recipe.  It is adapted from a weight watchers cook book called "5 and Under".
My chili recipe is really never the same twice.  It kind of depends on what I have in the house, but it always turns out great!  Who doesn't love a hot bowl of Chili on a cold winters day?!

1 tsp olive oil
1 large onion, chopped
3 garlic cloves, chopped
1 can of chopped mild green chiles, drained
1 lb ground beef
2 14 oz can diced tomatoes
1 cup salsa
1/2 cup water
1/4 cup chili powder
3 cups dried beans, (once prepared this is about 3 cans of beans)  I like to use a variety
1 tbs cumin
1/2 tbs smoked paprika
Salt and pepper
Cheese, Sour Cream and Cilantro for serving and garnishing.

Sautee the onion in a large stockpot until softened, about 5 minutes.  Add the garlic, and chilis and cook for another minute.  Add the ground beef and cook until no longer pink, breaking up as you go.  I use lean ground beef, so there is not a need to drain it, but if you like to, then go ahead.  Add the rest of the ingredients and simmer.  The longer it simmers, the better the flavor will be.  You can also do this one in the crockpot.  Just brown your ground beef, then put everything in the crockpot.  

As I mentioned, I never make this the same.  If I don't have green chilis, I omit them.  If I have bell peppers in the house that need to be used, I'll chop those up and add them too.  The main thing is getting the spices you like to the amount you like.  Sometimes I used the smoked paprika, and sometimes I don't.  This is not a spicy chili at all.  So, if you like spicy, then add some Franks Red Hot, or some Cayenne pepper.  

Also, I have a local source for beans, so I buy dried and prepare them in the pressure cooker.  Yes, it's a bit more work, but not too much effort for me.  I love having the freshest of ingredients.  But, this recipe is great with canned beans too.  Again, I like a variety, so I may do 1 cup cranberry beans, 1 cup pinto, and 1 cup kidney.  Sometimes I do a white bean or a black bean.  If you want more info on how to prepare them drop me an email or a comment.  The pressure cooker method is here.  
Wednesday, January 18, 2012

A-Z Challenge

She Sparkles Scripture Memory Challenge 2012


Hi Friends!
I usually blog about food, the physical kind, but today, I want to talk about Spiritual food.  The Living Word of God.  If you know me at all, you know that I'm very passionate about food in general.  What a gift.  The bible says "man cannot live on bread alone, but on every word that comes from the mouth of God" (Matt. 4:4).   How true that is!  Just like food nourishes us, refreshes us and delights our senses, so does The Bible.  It says "Taste and See that the LORD is good". (Psalm 34:7-9) .

I'm participating in the A-Z scripture memory challenge that my friend Cindy is doing over at She Sparkles.  If you want or need some inspiration in your life, check out her blog on a regular basis.  I just love her blog and all it offers.  I hope you'll join me in the challenge.  It's not too late, we're only on letter B!  Believe in the Lord Jesus Christ and you will be saved.  Acts 16:31.

This week Cindy is giving away 10 Starbucks gift cards!!  Have I mentioned how much I like coffee too?  Especially Starbucks!  Just click the link below and you can get started!  I hope you'll join me on this journey.  The spiritual 'food', is the best food we can get.  It nourishes, refreshes, and tastes better than any other food out there!

Blessings my friend!!


She Sparkles Scripture Memory Challenge 2012


P.S.  I hope you'll leave me a comment and let me know if you are joining in.  :-)

Sunday, January 15, 2012

Tostadas


Have I mentioned I love Mexican food?  One of the great things about tostadas, is you can load them up however you want.  The ones I made here are a vegetarian version, but we've had them before with meat too.  I love the crunchy shell, great texture! 

Vegetable oil
Flour tortillas
Refried beans (we did homemade, but you can use canned)
Guacamole
Cheese
Sour cream
Taco seasoning
lettuce
tomato
Cilantro

This list includes what these are made with, but of course you can add beef, chicken, pork, onion, black olives, and so on, whatever you like!

Heat oil in a large pan.  There should be about a half inch or so of oil in the pan.  If you aren't sure when it's ready, just sprinkle a drop of water in it, if it sizzles, it's ready.  I did 1 tortilla at a time.  It will puff up while it's cooking, you may want to press the bubbles out, so you have a somewhat level surface to put your toppings on.  Fry the tortilla, flipping once, until it's golden on both sides.  It won't take long.  You'll notice that the first few will take a little longer, then it starts going really quick.  Lay the tortillas on a baking sheet lined with paper towel.


After your finished, start loading up your toppings.  We did the refried beans first, then a layer of guacamole, then cheese, lettuce, tomatoes and cilantro.  I mixed some sour cream with a bit of taco seasoning, and topped it off.  That gave it a little color and a burst of flavor.
Yummy!  


No Bake Energy Bites


I saw these fabulous little things on Pinterest.  It originally comes from Smashed Peas and Carrots.  I altered the recipe a bit because of what I had on hand, but I'll let you know of the changes as I go.  The kids loved these.  I thought they tasted way better than a cliff bar or other energy type bar.  My husband likes them after his run as a recovery snack.

1 cup oatmeal
1/2 cup Peanut butter (or other nut butter)
1/3 cup honey
1 cup coconut flakes
1/2 cup ground flax seed (I used wheat germ because I was all out of flax)
1/2 cup mini chocolate chips
1 tsp vanilla

Mix everything until well incorporated.  The original recipe says to chill it, then roll it into balls.  I use natural peanut butter, which I keep in the fridge, plus my wheat germ was in the fridge too.  So, I had no trouble rolling it right away.

Enjoy!


Friday, January 6, 2012

Mac and Cheese


Come join Mac and Cheese Mania at Rachel Cooks andNutmeg Nanny sponsored by Door to Door Organics and OXO – Win prizes!

Update!  Today I'm joining Mac and Cheese Mania!!  This is my favorite mac and cheese recipe.  It's a great traditional mac and cheese and I love the hint of nutmeg.  Oh so creamy and delicious!!

Go visit Rachel Cooks or Nutmeg Nanny to find out more about Mac and Cheese Mania and enter to win some fabulous prizes!!  


There is nothing quite like comfort food!  We were at a Christmas Party with the people my husband works with.  It was so fun to get to know the people my husband works with and their families.  Sarah put out an amazing spread.  I wish I would have brought my camera!  All the food was beautiful and delicious.  I had to inquire about her Macaroni and Cheese, it was just so good.  So she shared with me how she makes it.  This is a very loose recipe.  I didn't get measurements or anything, so this is my attempt at recreating her Mac and Cheese.

1 lb short pasta
4 tbs butter
1/4 cup flour
2 1/2 cups Milk, half and half or cream.  I used skim milk.
salt
pepper
nutmeg
cinnamon
1 log goat cheese (herbed or plain)
1 8oz block of Cheddar cheese, grated

Preheat oven to 350.

Cook your pasta according to directions.

First, make a roux:  Melt the butter over medium - medium high heat.  When it starts to get a little frothy or foamy, add your flour and whisk together until a paste forms.  This only takes a minute or so.  The longer you cook it, the deeper in color it will be, so it's up to you if you want to add a little color to your sauce.  Congratulations, you've just made a roux!  (sounds so gourmet, don't you think?)

Next, add the milk (or cream if you want it richer).   Whisk constantly until everything is smooth, and thickens up.  Not totally thick like a paste, just thick enough to cover the spoon.  Add some nutmeg, salt and pepper.  Now you can add your log of goat cheese.  Stir constantly until all melted.  It's a good idea to be stirring constantly and not have your heat too high.  You don't want to burn the milk.  Once your goat cheese is melted, you can add your cheddar and again stir until melted.

Put your pasta in a baking dish, and cover with the cheese sauce, mixing well.  Bake, uncovered, for about 20-30 minutes.  You just want it warmed through and bubbling on the sides.  Sprinkle a little cinnamon over the top and serve.

Mmmmm, comfort!  :-)

Pineapple Jalapeno meatballs

Are you planning a Super Bowl party yet?  I brought these to a New Years Eve party.  I'm not sure if it was my husband eating them all or if people really liked them!  Haha!  My husband had been mentioning meatballs since my Christmas Eve Open House.  I refused him as I was already into 3 days food prep for the party.  He kindly said:  "It's not too late, I can fire up the Crockpot" on Christmas Eve.  To Which I replied:  "Sorry honey, I need the Crockpot for the Hot Cocoa Bar".  So, I decided to love on my hubby by making him some meatballs on NYE.  This is not your traditional recipe.  It was really good, and not burn your lips spicy.  Plus, it's super easy!!

1 lb ground beef
1 egg
2 Tbs water
1/2 cup bread crumbs
2 Tbs dried minced onion

For the Sauce:
1 jar pineappple preserves
1 jar jalapeno jelly

Preheat oven to 350.
Mix the beef, egg, water, breadcrumbs and onion well.  Form small meatballs and place on baking sheet.
I got about 35 meatballs from one batch.  Cook in the oven for about 20-25 minutes, turning once.


Meanwhile, put your preserves and jelly into a small saucepan and warm.  I did this just so it would be thinner and spread over my meatballs easier.

Once your meatballs are finished cooking, you can put them in the crockpot and cover with the sauce.  Stir gently.  I kept my crockpot on low just to keep them warm.

Enjoy!

Wednesday, January 4, 2012

Guest Post: Chocolate cupcakes with Peanut Butter frosting

Don't these look amazing?!  I assure you, they are.  My friend Torie made these once last year for her smallgroup.  I begged her to be in her smallgroup because I wanted a cupcake!  Okay, so food motivates me.  :-)  Anyway, being the sweetheart she is, she brought me 4 of them.  One for each person in my family, but she didn't blame me when I wanted them all to myself.  heehee!  

I told Torie she should guest post for me on my blog, but she wanted it to be a joint effort.  So last week, I joined her in her kitchen to make these.  Torie is an amazing cook, baker, sewer (or is the technical term seamstress?), photographer, home-schooling mom.  I know there's more that she does, and I'm continually amazed at her talents.  So, Here is my friend Torie:


Cake Recipe: 
1(18.25 ounce) package devil’s food cake mix
1 (5.9 ounce) package instant chocolate pudding mix
1 cup sour cream
1 cup vegetable oil 
4 eggs
1/2 cup water 


She's so organized...everything laid out for us.

Directions :

Preheat oven to 350 degrees.
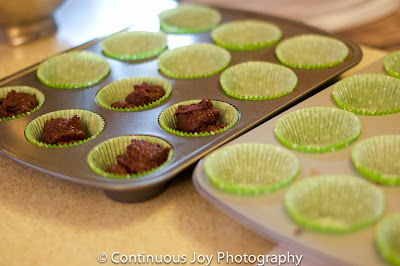
In a large bowl, mix together the cake and pudding mix, sour cream, oil, beaten eggs and water and pour batter into 2 well greased 8 inch pans or evenly distribute between 12 and 24 cupcakes. One note: this batter is thick so don’t be surprised by that. 


Bake for 15-20 minutes, until a toothpick comes out clean.


Peanut butter frosting:
1/2 cup butter (room temp)
1 1/4 cup creamy peanut butter
1 1/3 cups confectioners' sugar
1/3 cup cream

Cream Peanut butter and butter together.  Add sugar and cream alternating until you have the desired consistency. What I did was slowly added the sugar 1/3 cup at a time with 1 Tbs cream. after I mixed it I tasted it and repeated. It tasted best to me at 1 and 1 1/3 cup sugar.  It's VERY rich. I used ¼ cup of cocoa powder in half the frosting to do the swirl frosting.  Depending on consistency, you may need to add a little more cream with the cocoa powder.

To swirl the frosting, place 1/2 the frosting in one bag, and the other 1/2 (with cocoa) in another bag.  Then, put both bags in a larger bag and using a round tip frost away!   


Mmmm mmm!  I want to eat one NOW!  
Torie, thanks so much for the experience and the post.  Mostly thanks for the friendship.  :-)